Tuesday, January 31, 2012

Homage to Martha

Assortment of my Martha's*
Oh craft blog, how I love thee. I have been away from you for a few days now and I have longed to get back into the swing of things. With that out of the way, I once again began traveling through the endless hoardings that is my home looking for a new idea to inform the world about. Then I saw 'it'. It has taken years to compile (literally years). It has cost me endless amounts of money (all well spent!) It has been sorted into themes(holidays, babies, weddings). It has been referenced repeatedly (some more than others). It is my creative inspiration(a lot of the time). It is my collection of Martha Stewart Livings (the magazine).
Martha Baby Special Ed. 2000

Yes I may joke about hoarding but this is not hoarding. This is a library of crafting material (Ok I am a junior hoarder, so what!) Just as someone may keep encyclopedias or other useless materials (the internet has changed everything!) I choose to keep every single Martha that I have ever received (via mail or grocery store checkout). My question to the world is, why not? First off I have paid good money for them. Secondly I STILL use them, and lastly I like them. My first knitting instructional was in a Martha Stewart Baby Edition and I STILL HAVE IT! I have even let people borrow them for events, such as Thanksgiving table ideas, or wedding showers. So I would just like to raise my glass(purely a saying...) to the writers and fellow crafters that work for Martha. Without you I would not be the crafter I am today. Thank you for keeping the wheels in my little mind turning day after day with your well thought out and practiced 'good things'. You inspire me. End of story. 

*NOTE: For the record that is just a small assortment of my Martha's, believe me when I say there are tons more. I am a hoarder in the makings. 

Eat, Craft, and Read a Martha!

Sunday, January 29, 2012

Enter Sewing Machine

My Sewing Machine with Blanket
Over the years I have tried many different types of crafts (see older entries) but I never got into sewing. My mother did not have a sewing machine so the only sewing done was by hand and out of necessity ( ripped pants, missing buttons and such). This summer I spent a lot of time around an avid quilter and got to see her quilting room (yes an ENTIRE room dedicated to quilting, love it!) and was able to see some of her work and so my little brain got to ticking and I decided I needed a sewing machine.

Coonie in the box :-)
Christmas came and Santa listened(for once) and I opened my brand new 'Singer Talent'. Now this thing is still even more advanced than I need but I am so looking forward to discovering how to use its 32 stitches, button hole maker, and all the other snazzy things it offers me. For now we are just straight sewing.

Now the question is what do I make with this awesome thing? What kind of fabrics can I sew through? How do I thread this crazy white machine of awesomeness? Oh and, how do I sew? Irrelevant questions. I like to just dive in. We are making a blanket, end of story.

Beginning of Alphabet Letters
This all started with making a present for my niece. She is super smart and loves educational stuff so I wanted to create something with the alphabet on it(My friend Bean is the one who actually came up with the concept for this craft!) So I found some white fabric I had (I think it was actually a sheet that was once a toga...whatever!) and started embroidering on the alphabet in all different fun colors.

Once it was done it was super long, like over 6 feet, so now what? I thought it was going to be a nice wall hanging, but that just wasn't going to fly. BLANKET popped into my mind then brand new SEWING MACHINE. I set that baby up, figured out how to thread my bobbin(or something like that) and away I went. I went down to JoAnn's and got a fun retro flower print and sewed the alphabet onto it. Half way done. I needed a backing for this, so yet again, I went to JoAnn's found some pink and green striped fleece and sewed that on too.
Completed blanket :-)

Since I am not a quilter or even a good sewer I did not think about how the pieces of fabric would separate in the middle, like you could pull them apart and change the shape of the blanket? I don't really know how to describe it but I did not like it, so I put some tacking stitches using embroidery thread through both pieces at random intervals. Voila. I made a blanket.

Eat, Craft, and Be happy :-)

Saturday, January 28, 2012

Magic Wands...oh yeah

I had to really think about today's post. I was unsure if I truly wanted to expose my inner nerd for all of the internet (OK just my few followers) or if I should establish myself a little more first with more normal crafts but here goes. I have made my decision. We are talking about HARRY POTTER (said like Oprah)! If anyone out there was frantically awaiting the release of the final books and then having to wait for each and every installment of the movies then you would understand how exciting it was to have the final movie come out on DVD. So a party was inevitable, complete with all that is Harry Potter, and yes it was very childish and I can not even believe that I am admitting to it, but I made wands.

So if you are throwing a child's party (because this appears to only be acceptable for children under 10) then go ahead and make some wands. I just used a regular old stick that I found in the woods attached a wine cork using hot glue, then wrapped the cork with some twine for a handle. For the second wand I used a carved wooden parrot that I got in Belize a million years ago for the handle. The more creative you get the cooler the wands will be!! You can also then measure the wands (I think mine were around 14 and a quarter inches) or even have a wand selection ceremony ("The wand chooses the wizard Harry") and there you go. Add some Harry Potter themed foods (Butter Beer,Harry Pot-stickers, Dragon's Breath Dip, Chocolate Frogs), some Hogwarts clip art and you have got a party. The wands are not the best made things or even very creative, but they were a craft project so I had to write about it. No judgement please. 

Eat, Craft ,and Do Magic :-)


Friday, January 27, 2012

Curling...like Olympians!

Perfect release
'Curling?' you say. 'Yes, like Olympians.' No I am not going to talk about extreme hair curling. There is no such Olympic sport, that I know of, that involves any hair styling technique. I am talking about CURLING(read up children) a sport played on ice with stones and brooms. Sounds fabulous I know. Fortunately I become a fan of this sport every two years when I get to enjoy its awesomeness from the comfort of my couch. It is the sport that crosses shuffle-board, the strategy of pool, the housewife skill of sweeping, and ice.  (Fun Fact:The first curling club in the United States was established in 1830).
Sweeping
 'Why are we talking about Curling on a crafts blog?'. We are discussing this glorious sport because I, Stevie Salamander, participated in my first curling match last night. Long story small, the local Parks and Rec department decided to start a pick-up league for those interested in this ancient sport and they created there very own 'stones' (the things you score with) using a DIY method. VOILA anyone can now learn the art of curling using crafty ways. 

Me curling :-)
You will need: cement, 16 tea kettles (yep, I said tea kettles, 8 of one color and 8 of a different color), some brooms, and a sheet of ice! That is it!
Tea Kettle Stones


Fill the kettles with the cement. (Regulation stones weigh about 40lb, yours will not). Now read how to play and you are all set.(Curling Basics) You have just created your very own stones for curling!


Eat, Craft, and learn to Curl!

Thursday, January 26, 2012

Wine? Yes please :-)

Front of Glass
Today's post is yet again related to my time spent at UVM. Being in Vermont just makes me happy so when it was time to leave (I still like to make return visits several times a year) I wanted to gather as much UVM/VT related items as I could. PROBLEM: I was and still am a poor college student(OK I graduated again in December, but I am still poor!) So how was I supposed to afford all of the many awesome commemorative things that I wanted? ANSWER: I couldn't afford them, so I will create them!

Back of Glass
Now that I had decided I would make UVM things, what would I make? The question didn't need to rattle around my brain for too long because the words "hand painted wine glasses" appeared almost instantly. Ben Franklin craft place(do not remember the actual name) provided me with all of the items I needed. Glass paint, some simple $2 paint brushes, and cheap HUGE wine glasses. Perfect! Then all I had to do was skip some classes and start crafting.

Both glasses finished
I free hand painted all of the work on the glasses. I was super surprised they even came out legible since I think I was drinking while making them!( Just looking at wine glasses made me thirsty apparently) I choose to use green and gold (UVM's colors, DUH) for all of the work and that was it. Wrote UVM, added some random design then glazed it over with the clear finish that came with the paint. Instant UVM memorabilia all for under $10. Take that campus store! This project can be modified to personalize with names, 'Mr' and 'Mrs.', other schools, places or just add a design. You can also change the glass type. Plain coffee mugs,  rocks glasses, anything! Quick go grab some cheep glass and begin personalizing!

Eat, Craft, and Drink Wine :-)

Tuesday, January 24, 2012

Yardsale Recycle

As I awake this morning with a medium fog in my brain (I found out I passed my boards yesterday!) I decide that I will blog about something that does not require much brain power. Awhile back I received this awesome postcard/ alumni update from UVM (located in the most amazing city ever!) and wanted someway to display it.  I will admit that I probably did not even read the back of the card, I am sure they were asking me for money, HA! So I went on an expedition within my own home, and since I like to call the style of my home 'early american yard sale', it truly is an expedition. I found these three awesome, old school, big, chunky frames with hideous generic pictures in them. Jackpot.

Frames with 'blah' print
I figured no one would miss the plain-jane prints (note: my mother is a medium hoarder and notices everything) so I set about removing them. The backing on the frames had been tampered with in a previous life so they were pretty easy to remove.(silly me) I simply used a screwdriver to bend some nails and then attempted to slide the backing out. Not so simple. It turns out that somebody, somewhere really liked these horrid prints of meadows and children sitting in grass, and decided to tape and glue them into place. Since I no longer had any care for these prints, they were ultimately ripped and destroyed for the sake of my sanity.


Final Creation

The UVM card was then trimmed to fit. I find the simplest way to measure a print is to use the glass from the frame you are using to mark the size. (You can also then visualize what the trimmed picture will look like!) I then found a new piece of cardboard as the backing and since it is against a wall, I do not really care what it looked like, as long as it holds the picture in. Then it was complete. Ta-Da!


Yardsale recycle: when the trash from someones home enters mine, it will be revamped!

Eat, Craft, and Drink lots of water :-)

Monday, January 23, 2012

Mod Podge Shmodge

Having a little more free time than usual has allowed me to enter a new realm of crafting. Begin 'the all day crafting' adventures now. With that said, I have discovered Mod Podge. Now I have known what Mod Podge was, I just have never used it in my crafts, until today. I love crafts that are messy and create disasters in my crafting zone so when I saw this project I was psyched! I found the idea for this at 'From Chaos comes Happiness' Blog and of course added my own twist and twirls to it.

Supplies
I used a 12x10in canvas board as my base, various scraps of paper( I have TONS of paper), stick on letters, Mod Podge, white paint, and some foam brushes. (These were all pretty basic supplies that I had previous to the adventure). Go!

Using a 'decoupage' format, I ripped the various pieces of paper and Mod Podged them to the board in a random-esque style. Let it dry.( I am way to impatient and started the next step before anything was dry...it still works)

Decoupage the board
Then I decided on the words that I wanted my board to say, "Just Breathe". This is my newest mantra since I tend to freak out over little things so...Just breathe! Stick the letters onto your completely dried and fabulous looking board of randomness and then PAINT EVERYTHING white. Allow to dry (or again in my case just go for it) and then peel the letters off, reveling your colorful fun underneath!
Final Creation


Finally just scratch away some of the paint reveling a hint of color and to give it a snazzy rough quality. Then add some left over scraps of paper and you did it!! You can also add some other three dimensional accents( buttons, jewels, flowers, string) or outline the words in black or even write over the white to add some flair. Whatever you want to do, it is your craft!!

NOTE: This is a messy project! Be prepared to have your work space overflow a table onto the floor, couch, kitchen sink..you get the idea! You have been warned!
Eat, Craft and Be Happy :-)

Sunday, January 22, 2012

Here, there, the world!

Maps, such a common tool, but yet in paper form they are being forgotten for the more technologically savvy GPS things. I personally dislike GPS and would rather follow a road atlas, and although I would be horribly lost, it would be my own fault for not learning to read an atlas in the first place! (Damn technology!) Also I have always enjoyed looking at globes, imagining the places on the far reaches of the map, twirling them really fast and stopping them with your finger ("that's where we will go!"). So why not make art out of these already marvelous creations?
Martha's Map Examples 

As the summer (2011) was coming to a close I was busy looking for a way to capture all of the adventures that my friends Jason, Seth and I had been on. We had made so many memories ( we might not all remember all of them) and done so many activities that I wanted a way to put it all together into one project. So yet again I went searching on the internet and VOILA Martha always has the answer. (Here is the Map How-To by Martha Stewart my hero ) I took this road trip idea and applied it to our summer of boating on Lake Winnipesaukee. This was actually a pretty simple project that can be altered to fit any trip or adventure!


I first had to find a map of the lake that wasn't too small but also not gigantic. (This project ended up being 20in x 17in) I then figured out all of the places that we went, and the routes that we took so as to be accurate. Since I am not the best at navigating the lake I did get some assistance from my good friend Bean( she is a pro) as to certain locations of sandbars and such.
My Map Art  :-)
So I then just embroidered the pathways using blue embroidery thread with a red X marking the destinations. A big yellow star marked 'home base' (Jay's house)and that was it (for a minute..) The map looked too plain at that point so I added the words '"Summer 2011' using an embroidery font I found in a Martha magazine (that lady truly thought of everything!), but then there was still this big wide open land mass in the Moultonborough, Tuftonboro, Wolfboro area. TA-DA!! I took 547,423,234 pictures this summer so I found an individual shot of the three amigos that I felt fit each one of us best and tacked them on using yellow and green thread. Small initials in the corner ( I sign everything with SAS) and the map was complete!
NOTE: I gave this to Jason L, who made the summer unforgettable for me, so as to never forget how awesome Summer 2011 was! He loved it :-)
Eat, Craft, and Be happy!

Saturday, January 21, 2012

I shall call you Calamari!

Mesmerizing stripes!
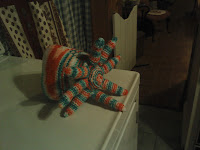
Now that I have officially taken my nursing boards I can devout lots of my idol time to my blog. This morning while I was wandering aimlessly around my home thinking about my beloved new baby blog, I saw a pile of yarn and decided that knitting would be my topic yet again. "Knitting?" you say, "Again?" Yes, but not just any old knitting, stuffed animal knitting!
Calamari :-)


I have grown quite fond of creating gifts, as I have mentioned previously, but what do you make a 3 month old beautiful baby boy (my godson in this case)? A stuffed octopus, DUH! I originally set out searching Lion Brand Yarn's website for a free stuffed animal pattern and out of all of the patterns I perused (probably hundreds, no joke), I decided that my godson would have a one of a kind octopus! What small child has an octopus stuffed animal? It was just random enough, but still could be a lovable creature in years to come. So I found the pattern * and then I had to decided on a yarn. 


Like most knitters I have an entire large tupperware container filled with various types, and colors of yarn, and I only plan on adding to that pile. (Sometimes you just HAVE to buy yarn when it is on sale, it is a rule!) After some digging and sorting I decided that a solid color just wouldn't be good enough. I choose a multicolored Peppermint sock yarn (one time I heard someone refer to yarn that makes strips as sock yarn, I don't know) that had greens, whites, and pinkish colors in it. Then VOILA I created an eight legged, striped, octopus stuffed animal who I named Calamari. (Yes I know calamari is squid, work with me people!) Now go make your own animal of joy!

*Note: I actually attempted to follow this pattern all the way up to the point of creating eight legs. They are all different lengths and widths because I honestly just wanted to get them over with. The end.

Eat, Craft, and Be happy!

Thursday, January 19, 2012

Want it? Make it!


For years I have made a habit out of scoping out places like HomeGoods (mostly ever since I worked there in Burlington, Holler!) for ideas. I am always looking for something that I love and then I justify NOT buying it because I could make it. So there ya go, want it? Make it!
Original Item at HomeGoods
This holiday season I was drawn to a framed 'thing' at my local HomeGoods. It was a piece of red felt with some cut out snowflakes sewed on and the words, "Do you see what I see...?" embroidered underneath. So I thought to my self, "SELF, YOU CAN DO THAT! So I went to JoAnn's and bought me some felt( $0.10/ piece, not bad!) and I got to work.

First Attempt
Since I was just getting into embroidering I was unsure of how to best go about making the words. I trialed a few different methods. First I wrote out the words in red ink and tried to just embroider over it, but my embroidery was always coming out bigger than the space I had provided( semi-fail = back to the drawing board). After a few attempts, I realized it was best if I just free handed the words. Although they were not perfect, for the project I was making, it gave them a kind of homey and childish feel, and it worked. I think.
My Final Creations :-)

LESSON OF THE DAY: Don't just buy something and spend silly money on it because it is nice and pretty. Could you make it? Would it be WAY cheaper to make? Would it be a sweet arts and crafts project for you and a friend? Do people like homemade gifts better than bought? YES, YES, YES.

Eat, Craft, and Be Happy!

Wednesday, January 18, 2012

Mismatch by two-to-too-2?

Today I woke up to a chilly day and found it even chiller inside my home (since I refuse to truly use heat other than to keep pipes and parrots from freezing). In my quest to find warmth I discovered some old knitted crafts of mine and VIOLA a new blog entry!

Back when I was first learning to knit in the round ( a task that took me some time to master) all I wanted to make was mittens. I quickly discovered that I can not follow a pattern to save my life. I commonly decide to increase or decrease using my own methods and spontaneously will do these additions or subtractions out of turn. I also never remember to count rows and therefore making two of anything always is a MISMATCH ADVENTURE!!
First/Worst mittens EVER
After the first few attempts (yes I made several mismatch objects that I still use...don't judge me)at making paired objects I realized that I needed to put more care into my technique and to follow patterns, or at least mark down where (and how many times!) I travel down the unbeaten path. My mittens are not only mismatch, but they do not even fit! They are the tiniest things ever because I somehow believed the pattern was for giant hands and I needed to downsize it. I was wrong.

Leg warmers...note: things that scrunch can be mismatch!

So today's entry is generally a visual approach to viewing some of my mismatch objects and how even when I do not follow a pattern I can still create similar objects. Leg warmers can be mismatch (to an extent) because they scrunch. A helpful bit of knowledge I found. Next I created my wrist warmers which were originally from a pattern but as I went along I decided to venture into the unknown and create my own pattern. The key to success was doing my pattern again for a match!
Wrist Warmers..Ta Da!


TAKE AWAY MESSAGE: Add your own flair to your crafts. Do NOT follow patterns to a T and stress over how many rows you have done (Oh NO! am I on row 13 or 14? or 25? I don't know! AHHHH) Just go with it and make sure you make the same mistakes or purposeful deviations again on your second piece!

Eat, Craft, and Be happy!

Tuesday, January 17, 2012

Burn Baby Burn

Now that I have begun my blogging adventure (which I am doing instead of studying for my nursing boards that I take in 3 days!eekk!) I can share with you some of my work. I will start with some of my wood burned creations because they tend to be some of my favorite things and I like them. 


Lachance Wedding Gift 2010

Mostly all of the crafts that I make are for gifts and woodburned creations are my number one loved gift (or so I have heard). This was one of my first signs that I made as a wedding gift. The couple was married on the lake and from the area, but moved down south, so as a reminder that home was never too far, I created this 'indian-like' font (Lake Winni is a Native American name) and map quested the distance. 


Urban Wedding/Army Gift 2011
Woodburning is something that I was introduced to in high school during an abstract art class where we were encouraged to use 'different' mediums for our work .Say goodbye to paint and paper. I feel in love with it. The smell of the wood as it is charred, the smoke in your eyes that stings all day, the little or sometimes BIG burns that you get and the way your hair smells until you shower....ohh yeah I LOVE IT! Its rough and tough but its still artsy and definitely crafty.

Family Christmas Gifts 2011

As you can see from my pictures I tend to make signs. I have already said I am not the best artist, so for now I stick to words (mostly). It has almost become tradition to make a sign as my wedding gifts and a few of them are posted here. I also made all of my Christmas gifts this year (as I always do) and gave my brother-in-laws and a few others signs. 
Morley/Achorn Wedding Gift 2011


I hope that you enjoy my pictures and maybe find your own spark in woodburning!!!
Eat, Craft, and Be Happy!

The Beginning

So as I peruse the internet looking at other craft sites (I prefer Martha or Pinterest lately) I find myself drawn to share some of my own creations with the world wide web. 


I have been crafting for as long as I can remember. As a young buck I used to make seashell creations, simple beaded jewelry, simple knitted scarves, scrap booking and even crepe paper flowers. Through high school I always loved art class and although I was not the most talented painter or sculptor I still had fun and made some pretty sweet stuff.  Then I entered college and since homework was boring and unimportant( yet extremely expensive!!) I decided to get super duper crafty! I got into wood burning, advanced in my knitting and got more into scrap booking. 


Now lately I have really been expanding my horizons. I taught myself how to embroider and so for awhile that was all my crafting. I got a sewing machine for Christmas ( Singer Talent...cha ching!) and have been messing around with it a lot making some simple crafts too. As you can see I have a wide repertoire( totally had to look the spelling of that up) of crafting skills and would like to share them all with you! For the fellow web surfer looking for new ideas, or for the beginner just getting started, here are some of my creations!
Eat, Craft, and Be Happy!